How to Hone/ Sharpen Your Straight Razor by Hand
You know what’s cooler than shaving with a straight razor? The sense of accomplishment you get after having shaved with a straight razor that you sharpened yourself!
Honing a straight razor is the act of sharpening it, by removing steel to form a new edge on your blade. Note that this is different from stropping, which re-aligns your edge between shaves.
I consider honing your own straight razor the pinnacle of sustainability and self-reliance. Once you have the skills and the gear, you can keep your own blade sharp until you’ve passed on and the blade is the responsibility of your favourite grandchild. While it may seem intimidating, sharpening a straight razor is much more straight-forward than most knife sharpening. Sharpening isn’t meant to take the place of honing it regularly. If you put care and love into maintaining your blade frequently, it will be easy to sharpen. If you neglect it, it will be way more of a pain in the behind when you finally go to tune it up.
Below I will outline all of the techniques that you’ll need to keep your blade sharp. I’ll also throw in some advanced techniques for the more adventurous among you. Along the way I’ll be using a lot of nerdy jargon, so I’ve broken it down in regular english to help you get your head around it. If you need to get setup with supplies, head on over to our Straight Razor Honing & Sharpening Gear Guide to get educated.
Ok, all that said are you ready? Here we go!
Technical language
Bevel - The portion of the edge being sharpened. There is a bevel on either side of the cutting edge. Keep a close eye to observe the gradually polishing that the bevel goes through while honing. Do your best to keep the bevels a consistent width along the edge, and a similar width to each other. The more grinding you do on a given section, the wider the bevel gets.
Burr - A burr is a rough patch of steel that forms when you sharpen something. It forms on the opposite side of the blade from where you are grinding, and tells you that edge has met the opposite one. It is essential to get a burr when forming a new edge, but it also needs to be removed after each stage of sharpening (generally when you go from a coarser grit stone to a finer one).
Chromium Oxide - A waxy paste that is full of incredibly fine grit ranging from 13,000 to 50,000. It doesn’t grind steel the way a stone does, but rather buffs the surface of the steel to a mirror shine and grabs onto burrs that may be hanging on the blade’s edge. A must for serious sharpeners.
De-burr - The act of removing the burr. This smooths out the edge so it cuts properly. This can be done in a variety of ways. Rough deburring can be done on the stone you are using, by passing the razor back and forth along its surface as if you are honing. A suede strop covered in chromium oxide is often used, as it grabs the steel and de-burrs more effectively. Your final de-burring should be done on a strop.
Grit - The abrasive that makes sharpening stones work. The grit number (#1,000, #8,000, etc.) indicates its size, and therefore the edge it will give. Lower numbered grits are of a larger size, cut faster and leave a rougher edge, while higher numbered grits are smoother and work more slowly. Just like sandpaper.
Heel- The end of the razor edge closest to the handle.
Hone / Sharpen - These words get confused a lot. Honing is the same as sharpening, which is the act of grinding steel to a fine point. In the razor world, the term term honing is used more frequently.
Pass - Gliding the razor across the stone in one direction, and back again on the opposite side of the edge.
Strop - A piece of leather used to deburr and polish your edge. Strops are used on nearly every kind of blade as a final polishing step. Any straight razor owner should have a traditional flexible strop at the very least, but I encourage you to consider getting a paddle strop and covering the rough suede side in chromium oxide, to aid in polishing your blade.
Toe - The very tip of the razor, farthest from the handle.
The Technique
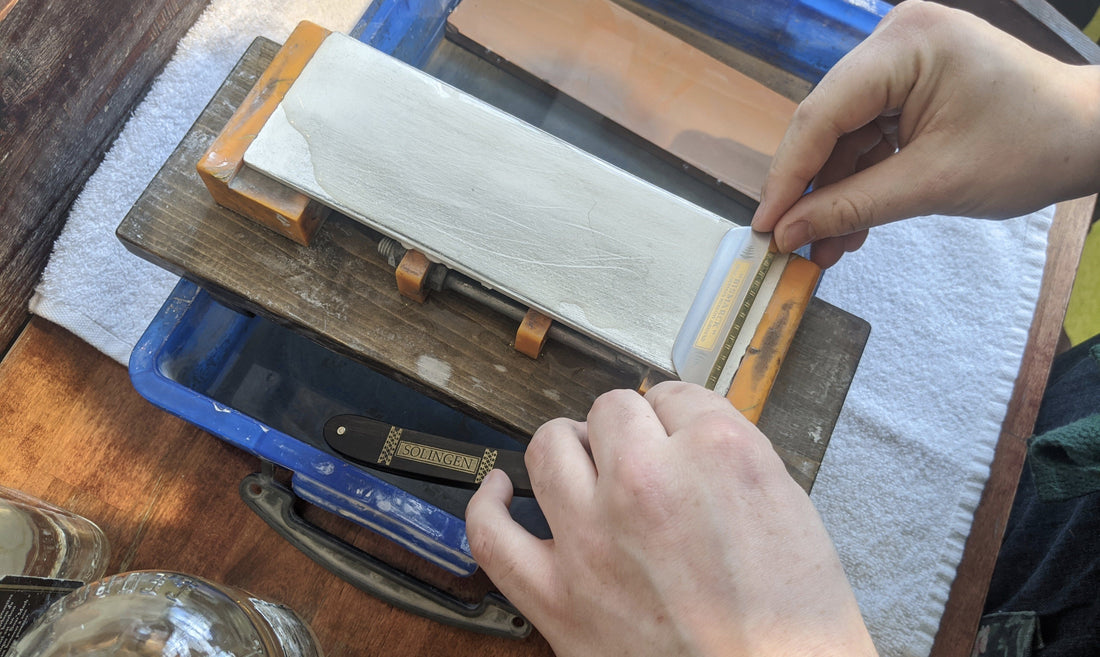
The basic method of honing (sharpening) a straight razor is simple. Lay the razor flat on the end of the stone nearest to you with both the edge and the spine on the stone, allowing the spine to set the angle. Letting the weight of the razor do the work, push the razor away from you to the other end of the stone, edge first. Lift the razor and flip it over, or roll it over the spine, and push the blade edge-first back towards your end of the stone. Work with the length of the stone.
 Basic honing technique.
And that’s it. Essentially, the motion of honing is essentially the same motion as stropping, but with the edge leading rather than the spine. Now you need to pay attention to the dos and don’ts:
- Always keep your stone doused in water. Be generous, like grandma said: “Don’t hone on a dry stone.”
- Keep the entire edge on the stone, don’t allow it to tip off. A finger tip on the toe end of the razor will keep it balanced, or you can place several finger-tips along the length of the spine. Never push the razor into the stone, let the gentle weight of your fingers do the work.
- Never sharpen the blade like a knife at a pronounced angle, let the razor’s spine set the angle. (See illustration.)
- Stop before you get to the very end of your stone.
- Don’t flip the blade over on the edge; scraping the edge will dull it.
- Don’t race. Speed comes naturally with lots of practice. Going quick when you’re learning will cause mistakes that will harm your razor or your fingers. Even pros mess up when they’re in a hurry.
- Some razors are longer than the stone is wide. This is fine. Start with the heel on the stone and the toe over-hanging slightly. As you glide across the stone, gradually shift it sideways, by just enough distance to bring the toe onto the stone and have the heel overhang. This should be a slight diagonal stroke, but be careful not to exaggerate the motion.
- Only use one side of your stone. Stones wear with time making their surface uneven. When you flip it, the stone wobbles which is a big-time pain. Put a big X on the other side in sharpie. Some stones have logos on the back, which makes it easy to tell which side you should be using.
 The 'X' stroke, exaggerated.
This is the basic technique. Stick to this, and practice it. Do a couple hundred strokes like this on your finest stone to get it down-pat. Doing it on a fine stone will ensure you aren’t shortening the life of your razor while you practice.
The Process
Now that you’ve got the basic technique down, let’s talk stones.
Start by testing your razor. I check mine on my arm to see how well it’s cutting and how badly it’s scraping my skin as it cuts. If you’re sharpening your go-to razor, chances are that you’ll know what it needs, but new-to-you or otherwise unknown blades require more attention. If the blade isn’t yours or you just bought it, always sanitize it in 70-80% alcohol first. Once clean, strop it generously, ideally on chromium oxide, to pull off any rough burrs and clean up the edge. In the shop we often see edges that barely cut, but once properly stropped come back to life and cut surprisingly well.
If your edge is pretty smooth, it may just need a tune-up on a 12,000, or maybe a 8,000 and then the 12,000. Head to step 3.
If it scrapes your skin you’ll want to start around 4,000 to clean up that scratchy edge. You’ll start at step 1.
If your razor doesn’t cut at all, you’ll need to get serious and start on a much rougher 1,000 or 2,000 grit. Be careful on these, as they remove steel much faster. Spend some time stropping your edge to see if you can avoid the use of a rougher stone. If that fails, we’ll go over putting an edge on your blade later on in this article.
The more you hone razors, the better you’ll get at knowing what treatment your blade needs.
- If you’ve decided to start on the 4,000, make 40-60 passes of the blade along your stone, in sets of 20 strokes, checking the edge after each set (if you’re doing something wrong, this allows you to catch it quickly). Count one stroke as a movement back and forth along the stone. The number of strokes will vary based on how hard the razor is. Softer razors like those from germany require fewer strokes, where denser Japanese steels like those used by Thiers Issard and the Portland Razor Co. require more work. Rinse your blade well to avoid bringing grit from this stone onto your finer stones.
- On your 8,000 stone repeat the technique, for 80-100 pases. Finer grits will often need more passes than rougher ones, as the finer texture grinds steel more slowly. Be very gentle on this stone. Rinse your blade again.
- On your finishing stone, repeat the same process for 100-150 passes, more if you feel the blade needs it. Be extremely gentle, allowing the stone to do all of the work.
Finishing & fine-tuning your edge
If you don’t know how to use a strop, check out our How to Hone Your Straight Razor blog & video.
Clean your blade well. Strop it, and test it. How does it work? Does it cut hair effortlessly, or does it drag? Does it scrape the skin or leave it unaffected? Try shaving with it if you can, to really get a feel for your results. If your blade shaves the way you’d like, great! You can clean up your gear and get back to shaving.
If you’re not happy with the results, start trouble-shooting:
Strop your blade, ideally on chromium oxide. Leftover burrs from honing can make the edge feel much rougher than it actually is, so get rid of them. If you’re not satisfied, go back to 12,000 grit, strop, and try again. In this manner, work back one step at a time through to the end until you get the result you want. Straight razors are such fine blades that it’s best to work conservatively until you identify the issue, rather than starting off on 1,000 grit every time and grinding of years of steel every time you hone a blade. If you have tried everything and failed to get results, that’s when you’ll take a step down to a rougher stone and remove more steel.
With practice, you will develop the intuition and habits that work for you. Jon in our Edmonton shop prefers to do more strokes on the lower stones and fewer on the finer stones. Some folks strop between every stone. Some use a microfiber cloth to check for small burrs that snag on the fibres of the cloth. I turn my stone 180 degrees halfway through using it to keep the wear on the surface even. Experiment, do what feels right, and don’t be afraid to ask us for help!
Caring for your gear
First and foremost, take care of your blade. Move slowly whenever you’re holding it so you don’t chip the edge or cut yourself. Always dry your blade before you set it down and try not to soak it while honing, it can rust afterall. If you’re setting your blade down, fold it closed to protect it from accidents.
Flatten your stones after you use them, and bevel the corners down with a few strokes of your truing stone so they don’t cut you or catch your razor’s edge. Wipe your stones down well. Store them away from excess heat or cold with the rest of your sharpening gear.
Most razor-honing stones are the “splash and go” type, which means you just splash water on them and get to work. Some stones require soaking, and the manufacturer will indicate if this is needed. Don’t soak a splash and go stone, it can cause them to crack.
Setting bevels & repairs
These techniques are far more advanced, and can cause serious damage to your razor if done incorrectly. If you plan to get this serious about honing, do so after you’ve had lots of practice with regular honing techniques. Consider grabbing some beat-up vintage blades to practice on, so you don’t destroy your favorite blade or shorten its lifespan considerably.
There are a few advanced techniques you may want to attempt. Typically you’ll either be honing a dull blade, repairing a chip, repairing a crooked edge, or re-setting the bevel of the blade. Here’s a basic breakdown of each technique.
Sharpening a dull blade
Sometimes you try to hone a razor that won’t cut whatsoever. You’ve tried all of your fine stones and failed to get results. This means it’s time to use a 1,000 or 2,000 grit stone. There are very few issues that these rough-grit stones can’t fix, and you should almost never need a rougher stone than these.
Start by using the technique described above, with slight pressure applied evenly along the spine of the razor. Avoid pressing near the edge as it can warp the steel, and never press hard on the razor.
Do 20 passes on the stone, strop your blade and check your edge. If it cuts, move up to the next stone. If it doesn’t, repeat the process until it does. A good razor can get a shockingly smooth edge from these stones, but rough burrs can make it seem dull as a butter-knife. When using rough stones, strop your edge frequently and check for burrs by feeling for rough patches along the edge with the pad of your finger.
If you’ve made hundreds of gentle passes like this without results, you can attempt to hone the razor with a knife sharpening technique. This can damage the edge, so be careful. Run your blade back and forth 20 times without flipping it. Flip the razor, and repeat the same method on the other side. Check for a burr. The burr should feel rough like sandpaper, and should pop up along the entire edge of the razor. If it isn't present or isn’t along the whole razor’s edge, repeat the process until both sides of the razor get a consistent burr along their whole length.
Once you have an edge, use the basic honing technique to make 20 passes along the same stone to help clear off the burr and establish a consistent polish on the bevel, strop your razor well, and move onto your finer stones. Throughout this process true your stones often, or you can end up warping the edge beyond repair.
Chip repairs
Chip repairs use the same technique used to re-establish an edge that I described above. Take your time and make sure to remove the entire chip. Even a small chip will take days to remove on a fine stone, so do the entire job on your 1,000 or 2,000. If the chip is severe, use a 220 or 400 grit stone for the repair. Avoid softer stones, as they will dish quickly. High-end hard stones such as the ones listed in our Razor Honing Gear Guide are your friend. Flatten your stone often.
Crooked Edge Repair
This one is real fun. If your edge isn’t flat, you must first flatten it, then reset your edge. Place the blade with the edge perpendicular (90-degrees) to the stone’s surface. Scrape it back and forth until you have a perfectly flat edge, then follow the process for honing a dull razor.
 Flattening an edge, 90 degrees to the stone.
Be warned, some razors will go crooked again as you reset the edge. This can be due to imperfections in the blade and may not be fixable, especially on some older razors.
Removing Unusual Bevels
In your travels, you may encounter a blade that has been honed at a higher angle than that naturally set by the spine, and it can present a great challenge to hone. The easy way to work with it is to put electrical tape on the spine to raise the angle, and hone as such.
The hard way is to reset the blade to its natural angle. This is done with the same method as honing a dull blade, and you’ll want to hone on a rougher stone until you get a burr along both sides. Something to watch for: the bevel that you’re working on will appear rough and scratchy, and the bevel you’re removing will appear in front of it, likely shinier. Keep an eye on how much is left as you grind, as this is a good indication of how much steel is left to remove.
Bent Razors
This refers to the whole razor being bent, rather than the edge being not-straight due to poor sharpening. Avoid these. They’re no fun. With that said, many family heirlooms are old razors that have warped over time. When working with an heirloom, consider how much steel you’re willing to remove. Do you value it more as a beautiful ornament, or a functional tool? If you really want to shave with it, you may need to work with a bend in the blade.
To tell if your blade is bent, lay it flat on a stone or glass shelf. The edge will touch the stone in some sections, and not contact it in others. The blade will bow one way. When honing the side that bows outward in the middle, you will need a rocking/ scooping motion to hone the entire edge. Use an exaggerated version of the diagonal stroke mentioned at the top of this blog, beginning with the heel at the edge of the stone and drawing all the way to the toe as you move along the length of the stone. This will let each part along the length of the razor contact the stone. The other side can be honed as usual. Be warned that the razor may grind away more where the bends are, creating an edge that is anything but straight. Be careful and take your time.
To tape or not to tape?
Perhaps the most debated topic in the world of razor honing is whether or not to ‘protect’ the spine of your razor with electrical tape while honing it. The truth is, it’s entirely up to you.
The spine of a razor is designed to set the angle. By design, they wear naturally with the razor, keeping the angle consistent over decades of sharpening. Taping will cause the angle to gradually increase in thickness over that period. The difference isn’t massive, so pick your poison. We don’t hone razors with tape at our shops unless requested by a customer, or sometimes when polishing really pretty damascus blades.
There you have it! If you find all of this confusing, don't sweat. Start from step one, and practice. Refer to the instructions until it becomes second nature.


