
Hair & Body


How to Sharpen an Axe by Hand with Whetstones

A sharp axe is a safe axe. Just like a knife, a well-sharpened axe will go where you tell it, without putting up a fight or shooting off in the wrong direction. A dull axe, by comparison, is an accident waiting to happen. Dull axes can bounce or glance off their target, ending up somewhere you don’t want them too. They also require more force to use, increasing the opportunity for an accident or back injury.
Of course proper technique is required as well, you can definitely injure yourself with a sharp axe, but we’ll cover that another time. With the right technique and a little practice, a sharp axe is the way to go. In this article I’ll be covering the basic techniques of hand-sharpening, so you can get a fantastic edge on your favourite tool!
Sharpening at its most basic, is the process of removing steel to form a new edge. A blunt edge will often look flat at the apex, or very rounded out. A sharp edge, by comparison, looks like the edge of a bullet. Two edges curving slightly outward to form a fine point. Before we get to technique, I’m going to cover some slightly nerdy terminology to help ensure that you sharpen your axe the right way.
 Getting familiar with axe terminology will help you through this article.
Maintaining Your Axe Profile
Most axes are sharpened on both sides of the blade, which is known as a 50/50 grind (same amount of grind on either side). Most modern axes either have a flat or convex grind on their bevel. Generally, the factory edge of an axe will be suited to the task it is designed for. Most axe sharpening follows the existing style of bevel, but you can change this if you choose to repair a poorly sharpened axe by reshaping the bevel.

The profile of your axe makes a world of difference to how it performs.
Axes with a prominent flat grind excel at fine work, such as carving, feather sticking, light kindling and even carpentry. A subtle convex grind is the most multipurpose and can be used for fine tasks such as kindling, feather sticking etc. but are equally as good at actual chopping and moderate splitting. Axes with a pronounced convex grind are going to excel at chopping/larger splitting. While processing kindling is possible, be aware that aggressively convex ground axes tend to dull quicker and can become dangerous to use for delicate work. Axes ground similar to wedges are for splitting logs. You can use them to chop smaller firewood but you can also use a bike tire pump to fill the air in your car tires. Don’t do that. Choose the right axe for the job.
Axes will also have a certain amount of curvature to the edge, or they may be completely straight. Unless you’re repairing or restoring an axe, it’s important to maintain this curvature or lack thereof. Together the curvature and the grind for the axe “profile” or “geometry”, and one of the main goals while sharpening is to maintain a good profile.
What tool do I Sharpen my axe with?
Whetstone sharpening is classic and romantic, and is the easiest way to sharpen a tool properly and consistently. Power tools can provide an excellent edge and the advantage of speed, but can very quickly damage your axe without the right technique. Whetstone sharpening is also something you can do when you’re out in the field. A belt sander is not terribly portable. One or two whetstones can tuck away nicely in your backpack when camping.

A good axe puck is your best bet for regular edge maintenance.
If you maintain your axes properly, you’ll only need a double-sided puck stone. If you ever go down the long road of restoration, you’ll likely want to invest in some files or take the time to learn how to use a belt sander properly.
Raising a Burr on Your Axe
As you grind steel, you’ll eventually form a ‘burr’. A burr is what happens to the blade when it gets so thin that the steel starts to deform and curl away from the stone. It forms on the side of the blade opposite the stone, and is something you can physically feel along the cutting edge of your axe. When you have raised a burr along the whole edge, you are ready to move on to the other side of your axe. While finding a burr is good when you’re honing, it can also get in the way of the cutting edge, so burrs should be polished off of your blade regularly between sharpenings.

How to Sharpen Your Axe
These instructions are for right-handed folk. If you are left-handed, reverse them.

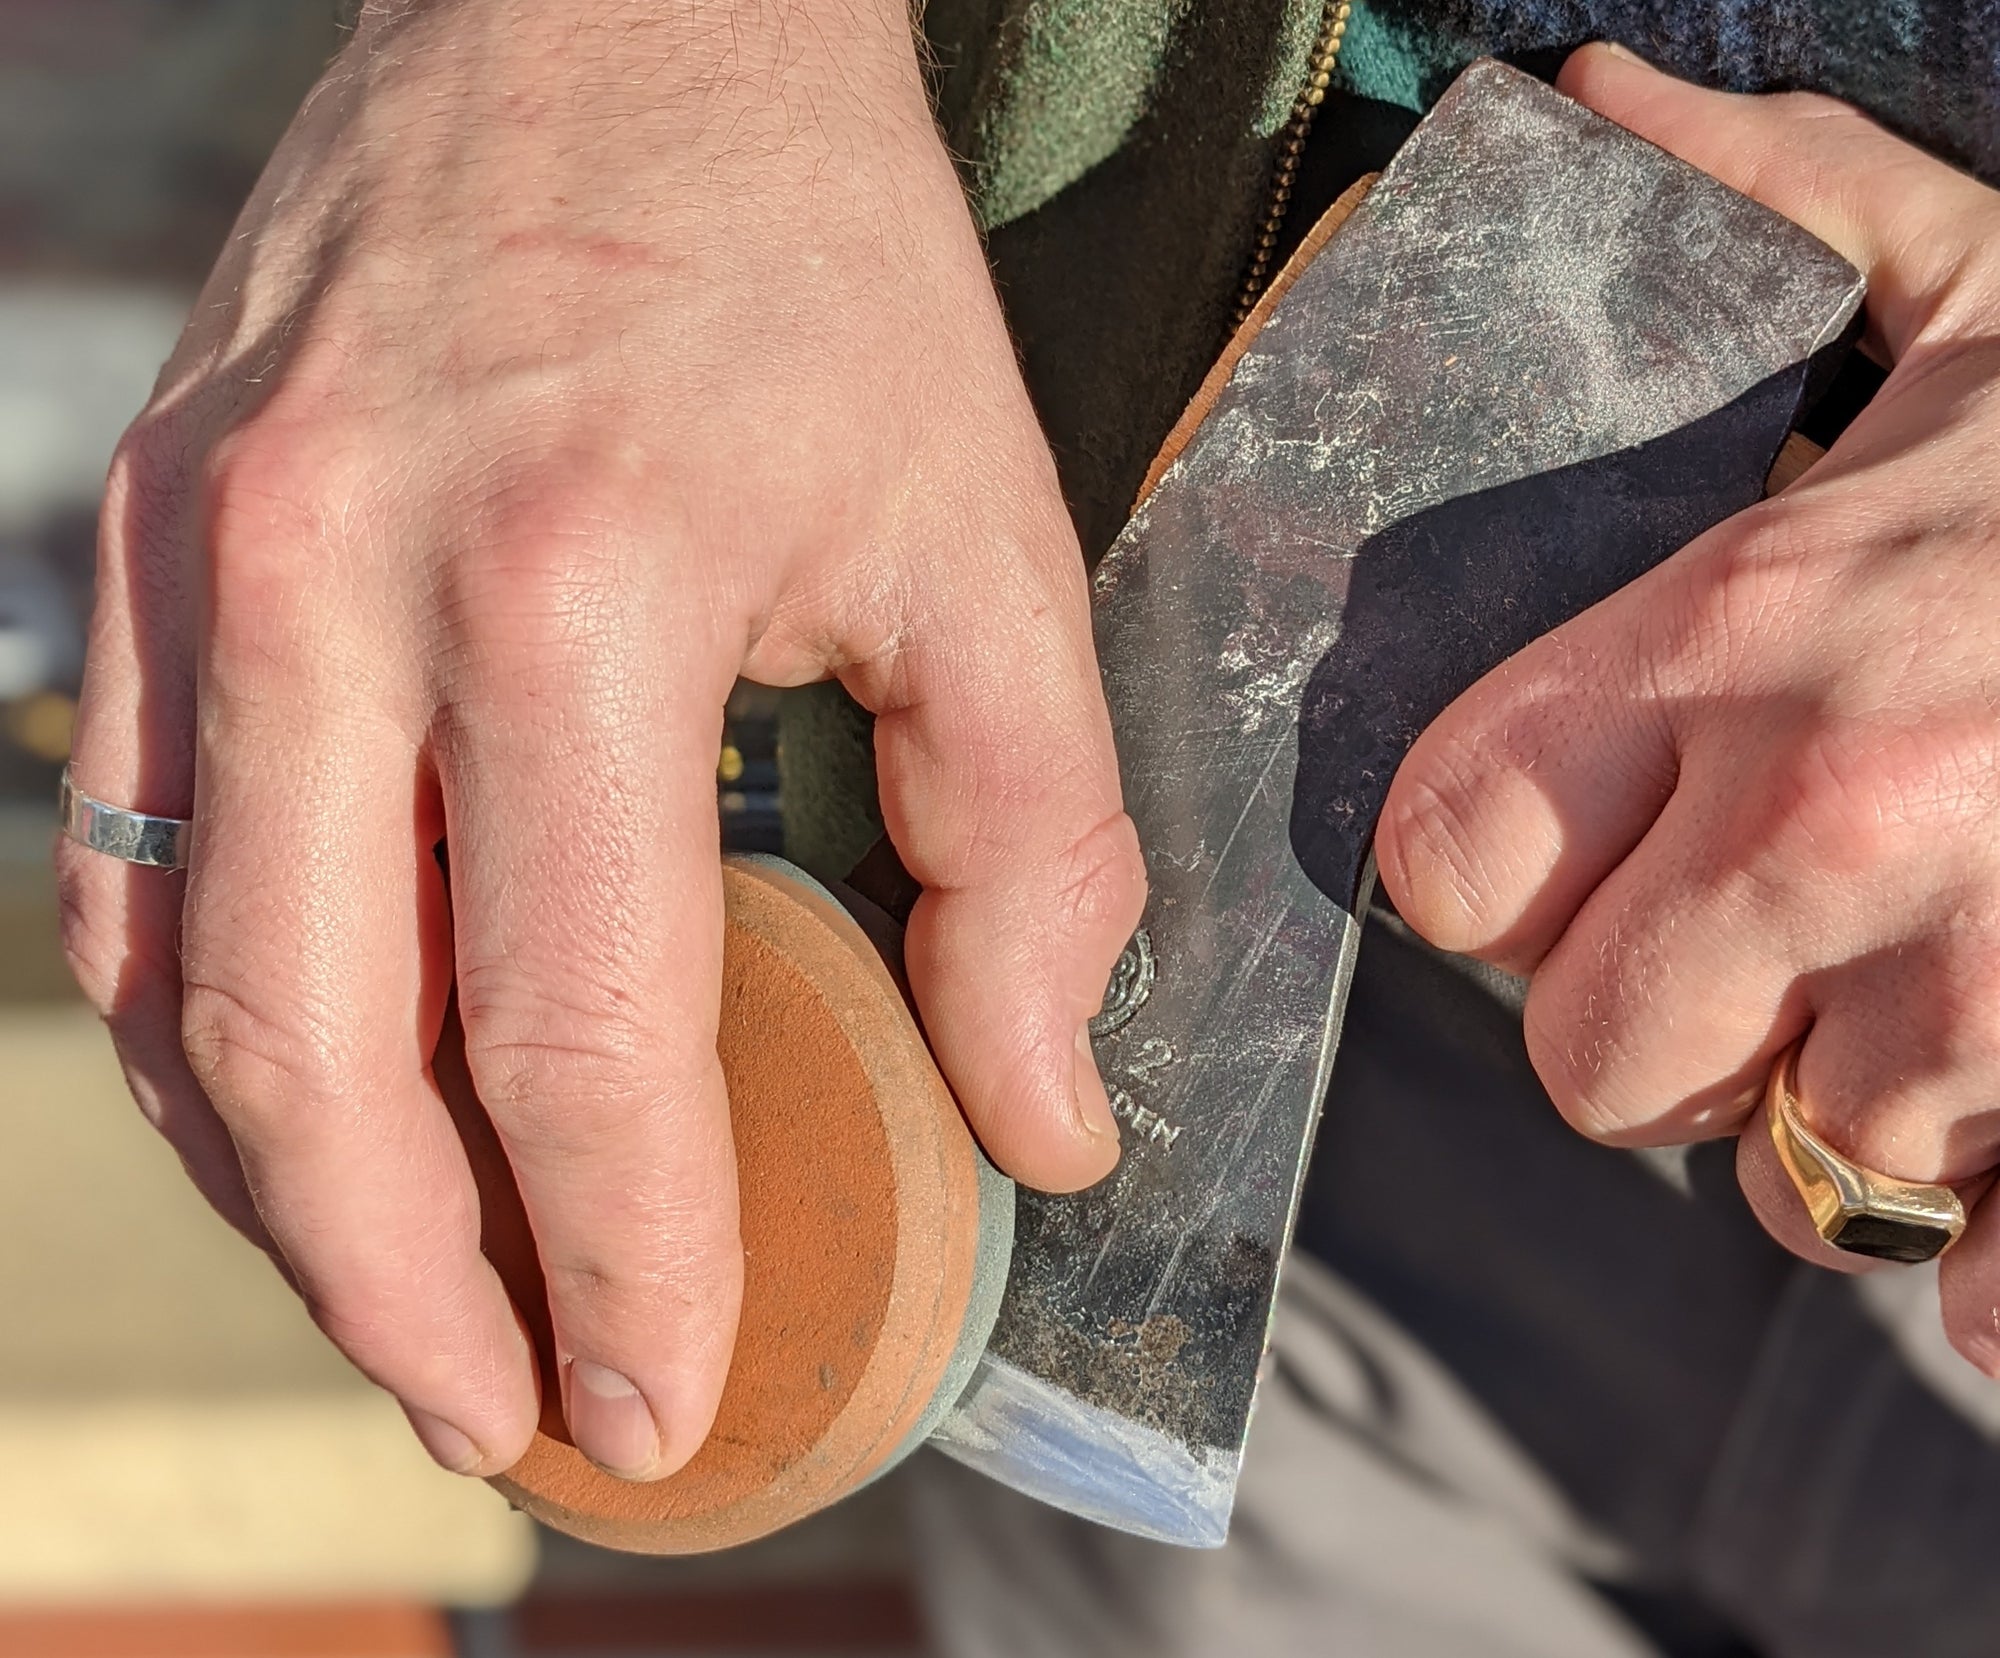
When starting out, hold your axe so you can see the angle that you're sharpening at. The stone should slightly overhang your edge.
Hold your axe with the haft over your left shoulder, cutting edge pointing skyward. When positioned like this, you will be sharpening the left side of the axe. Lay your coarse (150-220 Grit) stone flat against the cutting bevel.
If your axe is flat ground, lay the stone flat against the axe’s surface. If your axe is Convex ground, take a moment or two to find the angle near the cutting edge. To do this, move the stone around near the cutting edge until you find the sweet spot where the stone rests flat, hanging past the cutting edge.
Keep water for your stones nearby, to keep it lubricated along the axe edge. A small bottle will suffice. Apply a small amount of moisture to the cutting bevel. Make sure to re-apply frequently, when you hear a dry scraping sound. If your stone is designed to use oil, you will need much less to lubricate the stone. Be careful to never use oil on water stones.
With your coarse stone laying flat along the cutting bevel make small circular strokes and work along the entire length of your cutting edge. Ensure that part of your stone passes beyond the cutting edge with each motion, otherwise you will be thinning the cutting bevel, not actually sharpening the cutting edge. Alternatively, you can work in long sweeping strokes with the length of the edge. Most importantly, keep your fingers behind the cutting edge to avoid getting cut. Adjust your angle as you go to ensure you grind the whole bevel, not just the edge. This will help you maintain the axe’s profile.
Every so often, stop and check the other side of the axe for a burr. If you’ve raised a burr along the entire cutting edge, it’s time to flip the axe around. It will feel rough, a bit like sandpaper. If you find the burr is only raised on a portion of the axe then concentrate your efforts on the portion of the axe that still needs a burr raised. Remember: If you’re working on the left side of the axe the burr will form on the right side and vice versa.
Once you’ve raised a burr along the entire cutting edge you can reposition the axe so that the bottom of the haft is on the ground and the cutting edge is facing away from you. Now you will be working on the right side of the axe.
 Hold the axe with the haft facing away from you when sharpening the second side.
Repeat the previous steps until you feel a burr along the entire cutting edge, opposite the stone. Now that you’ve completed the coarse stone work, you will need to strip off the excess burr before moving onto your fine grit stone. To do this, run your coarse stone from Toe to Heel on one side of the axe, then do this same motion on the other side of the bit, Toe to Heel. Be sure to keep the stone along the cutting edge throughout the stroke. If you have a curved axe edge, you can use your wrist to arc the stone along the edge. Repeat this process until the burr has mostly been removed.
Position your axe as you did when you first started sharpening, with the haft over your shoulder. Do all of the same steps as before, but now using a finer 600-1000 grit stone. The burr you raise with the finer grit stone will be less substantial than on the coarse stone.
Finishing Touches
Now that you’ve sharpened the cutting edge of your axe, you may wish to improve the look of the bevel. That’s cool, we do too. Hold your axe with the haft over your shoulder and cutting edge skyward, as before. Now, take your fine stone and make repeated strokes along the whole edge of your axe, the same as removing the burr. When you’ve achieved the desired polish, flip the axe around and repeat the motion.
The ultimate way to finish your axe is with a Leather Strop. You can use a paddle strop and repeat the same steps we did when we were sharpening the axe, however this time you’re not going to raise a burr, but rather polish the cutting edge. Stropping with suede that has been treated with Chromium Oxide improves not only the physical polish of your cutting edge but will also help improve the shine on your axe. For best results, use a suede strop that has been coated in chromium oxide, followed by plain leather.

Good tools deserve good care!
How to maintain the edge of your axe
Now that your axe is sharp, you’d be wise to keep it that way. Upkeep sharpening can be done regularly with just the fine stone and will take substantially less time and energy. Remember: a sharp axe is a safe axe. It is less likely to glance off what you’re cutting and will go where you tell it. It will also split with less force, which prevents undue fatigue and potential injury. Regular tune-ups with your fine stone and your strop will ensure your axe stays in tip-top shape.
If you ever need help with your axe sharpening, don’t hesitate to get in touch with us or visit your local Kent of Inglewood and Knifewear shops for help. Sharpening isn’t the only kind of upkeep an axe needs, check out our Top 5 Axe Care Tips for more help!